adsense analytic

Wednesday, February 28, 2018

Vital factors to impact the design and construction of embankment dams

Numerous factors provide significant effect on the construction and design of embankment dam. Through the design phase, the designer should consider these factors to make the design better.

Given below, the detail information on these factors :-

a. Accessibility of materials for construction
b. Properties of embankment dam site
c. Shape and size of valley where the dam is developed
d. Atmosphere of the area
e. Diversion of river
f. Existing time for construction
g. Function of the reservoir
h. Feasible wave action
i. Earthquake activity in the area

Accessibility of Materials for Dam Construction: Generally, construction materials for embankment dams can be easily accessed and frequently available at or close to construction site at low cost. It will significantly impact the design of embankment dam.

If excavated material like earth excavated for spillway construction is utilized in the construction, the economy of construction is enhanced.
Embankment dam designed and constructed on the basis of existing construction material.
Type of material obtainable at project site Designed embankment dam on the basis of existing construction material.
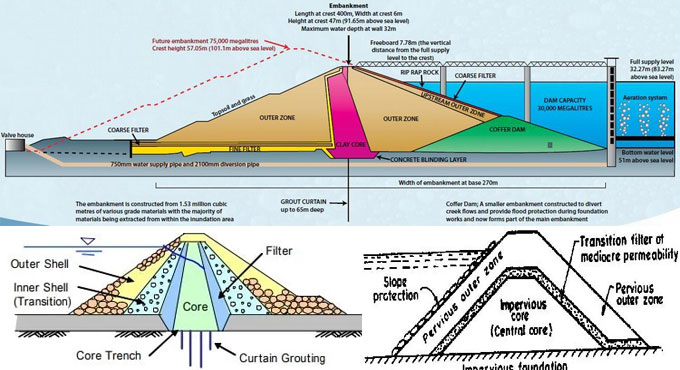
a. Impervious soil material Consistent embankment dam
b. Rock and impenetrable material Rock fill dam
c. Previous and Impervious material Zoned earth dam,
Properties of Embankment Dam Site: Normally, embankment dams are built up on nearly all types of soil. The design is significantly impacted by the characteristics of soil upon which the dam is built up. One of the significant impact is managing the type of treatment applied for the foundation.
Besides, soil properties affect the dimension of the dam as for example if the soil contains low bearing strength, then it is essential to trim down slopes and employ superior cross section and freeboard.
These measures are essential to deal with deferential settlement of the embankment dam.
For more information, visit the following site aitech.ac.jp
Vital factors to impact the design and construction of embankment dams

~~~~~~~~~~~~~~~~~~~~~~~~
Published By
Rajib Dey
www.constructioncost.co
~~~~~~~~~~~~~~~~~~~~~~~~

Tuesday, February 27, 2018

Variation among Lap Length and Development Length (Anchorage)

The reinforcement bars are mainly arranged to transmit the load from member to member i.e. either to another rebar or to concrete.

To transmit the load from one member to another securely & efficiently, reinforcement bars should have been tightly attached at both ends to resist skidding of the bars.

Lap Length: Lap length stands for the length of the overlap of bar necessary for securely delivering stress from one bar to another. Lap length varies in case of tension and compression zones and primarily based on concrete and steel. When, it is required to lap bars with various dia, the length is dependent on smaller dia.

The rebars are available in specific length. If the rebar has to be expanded apart from that limit, then there should be adequate lap length to safely transfer the load.

Lap length varies on the basis of tension (at bottom of a beam) and compression zones (at top of beam) and various factors like grade of concrete, rebar size, concrete cover etc affect the lap length.

Development Length: Development length stands for the length of the bar essential to transmit stress from steel to concrete.

As per IS456, the computed tension or compression in any bar at any section should be developed on each side of the section with an accurate development or by end anchorage or with a combination thereof.

As per IS 456:2000, the computed tension or compression in any bar at any section should be formed on every side of the section with proper development length or with an end anchorage to resist skidding of the member from the support.

Such length should be arranged in a continuous beam, cantilever slabs and other critical joints (beam-column). It will be supplied as a bend where the restraining member is thin similar to an end beam as demonstrated under (Ld).

Article Source: www.civilology.com

Variation among Lap Length and Development Length (Anchorage)

~~~~~~~~~~~~~~~~~~~~~~~~
Published By
Rajib Dey
www.constructioncost.co
~~~~~~~~~~~~~~~~~~~~~~~~

Monday, February 26, 2018

How to choose perfect brand of cement for house construction

The cement is considered as one of the most vital materials in building construction. It enhances the stability of any construction. So, the proper should be taken regarding the selection of cement as wrong selection can hamper the quality of construction.


While going to select the cement, the following queries may appear in mind :-
What type of cement should be chosen?
If similar type can be applied for all cement applications?
Which cement brand should be perfect for work?
Accessibility of cement chosen during construction period?
Given below, the solution of the above query, so that the perfect brand of cement can be selected.
1. What type of Cement should be chosen: Diverse forms of cement can be found in building works for different purposes. So, it is vital to recognize the properties of each type of cement and their applications. Normally, three types of cements are applied in general construction purposes which range from Ordinary Portland Cement (43 Grade & 53 Grade), Portland Pozzolana Cement and Portland Slag Cement.
Given below, different applications of these cements: OPC 53 Grade cement is effective in all RCC structures like footing, column, beam and slabs, where ever primary and final strength are considered as the most important structural requirement.
PPC and PSC cements are mostly recommended for general construction works as well as Masonry, Plaster, Tiling works since primary strength is not a prime factor of performance in this application.
2. Can similar type of Cement be utilized for all Cement Applications?
Various types of Cement contain diverse properties which can save huge money and make the quality of construction better.
The type of cement suggested for all RCC works is OPC 53 Grade because they contain extreme initial and ultimate strength, which are primary conditions for structural requirement (i.e., in RCC Members).
It is suggested to utilize PPC or PSC, whichever is cost-effective, for non-structural/masonry purposes like Masonry, Plaster, Tiling works etc.. These cements contain slower rate of heat of hydration and produce less cracks and lower shrinkage). They have greater functionality and can be completed in a superior manner because of the existence of fly ash in PPC & GGBFS in PSC.
To get more information, go through the following construction article www.happho.com
How to choose perfect brand of cement for house construction


~~~~~~~~~~~~~~~~~~~~~~~~
Published By
Rajib Dey
www.constructioncost.co
~~~~~~~~~~~~~~~~~~~~~~~~


Friday, February 23, 2018

Some significant benefits of drone in surveying work

Now-a-days drones become very popular in surveying works. Drones allow you to conduct a survey of your property easily for drawing up exact legal property lines. With drones, it becomes easier to demarcate the boundaries prior to start any major construction, fencing, or adding service roads. Given below, some vital benefits of drones.

Greater Resolution: A drone can fly nearer to the ground to catch aerial video and pictures. The produced images and collected data from the drone are sharper and contain superior resolution compared with the information gather from a plane or helicopter.

It facilitates to get more authentic information. Images with superior detail can be used for better decision-making in property utilization.

Access the unattainable: It becomes difficult to obtain perfect surveying results from the areas having dense brush, trees, ponds, rivers, steep embankments, swamps, and marshes. With misaligned results, it is not possible to get perfect result for survey in some cases. Drones can freely pass through any areas which appear as impossible. A drone can focus on areas which are problematic because of proper visual sighting. The results bring you the entire picture of the property as a whole.

Rapid Data Retrieval: Trained, professional drone pilots have good knowledge in obtaining the information instantly required by you. An “as the crow flies” feature reduces the time significantly for a survey crew to avail further reaches of significant properties. The drone will record all of the necessary information and set back instantly.

Security of Survey Crews: A survey crew often faces challenge while making survey in areas which contain rough, uneven terrain, cliffs, embankments, loose gravel, fast-running water, and tough brush. An injury may occur with little to no warning. With the use of a drone, it is possible to obtain a close-up aerial view and it safeguards the crews from danger.

Perfect Equipment for Mapping, Surveys, and Inspections: Drone is suitable for performing property surveys, mapping, as well as on-site inspections. All of these are accomplished instantly and with little disruption to any running construction work. You can get latest and perfect information that is crucial when perfect data is necessary for large projects.

Cost-Effective Results: A drone can bring you an accurate survey of the property with little human effort, in less time, and achieve superior results. These save your money significantly and get the real value for a property owner.

Some significant benefits of drone in surveying work

Read Continue

~~~~~~~~~~~~~~~~~~~~~~~~
Published By
Rajib Dey
www.constructioncost.co
~~~~~~~~~~~~~~~~~~~~~~~~

Thursday, February 22, 2018

A position is vacant for Senior Project Manager and Project Manager in construction sector (VIC – Melbourne)

A position is vacant for senior project manager in Melbourne, Australia. The prospective candidate has to report to the deputy general manager (construction) as well as supervise assistant project manager or project administrator.


Prime Activities:
• Make sure that the projects are going on in an well organized manner during the complete project management process from the preliminary brief, right through to the design process and on to fruitful construction management.
• Take responsibility so that the project can be delivered maintaining utmost standard of client satisfaction & quality.
• Create construction programmes to guarantee detailed planning of time, costs and quality of projects.
• Make communication efficiently with all the stakeholders of the project.
• Assign team leadership to your project team and retain commitment to render superior quality work.
• Sustain and manage cost, schedule and quality of project activities to carry on budget, time, and fulfill agreed customer requirements.
• Sell off and manage risk.
• Build relationship with senior staff inside client organizations concerning provision of services within negotiated contractual obligations for a program or projects.
• Retain and improve the company’s reputation in the marketplace.
Duties and responsibilities
Project management
• Concentrate on Residential Projects (Apartment) in Melbourne
• Consultant for team engagement & management.
• Project programming and status reporting
• Generate reports for project
• Evaluate plans & drawings
• Help out department management
Required Qualification:
• Sound local experience (in Melbourne) as a team leader and ability to deal with residential projects (Apartment) among $100M to $500M.
• Minimum 7 years working experience on the position of Project Manager in the local top tier Developer or Builder.
• Sound construction and project management work experience (Both Builder and Developer experience PREFER).
To apply for the post, click on the following link www.rfaustralia.com.au
A position is vacant for Senior Project Manager and Project Manager in construction sector (VIC – Melbourne)


~~~~~~~~~~~~~~~~~~~~~~~~
Published By
Rajib Dey
www.constructioncost.co
~~~~~~~~~~~~~~~~~~~~~~~~

Tuesday, February 20, 2018

7 Prime liabilities of a Civil Site Engineer in a Building Construction Project

A site civil engineer takes lots of responsibilities as per the company’s rules and structure of the project management team. Given below, the complete liabilities of a civil site engineer :-

1. Accomplishment of the project in due course: The key liability of the project management team is to deliver the project in scheduled time. A site civil engineer has also to take this liability as he is the part and parcel of the project management team.

To accomplish a building construction project timely, a project management team has to take responsibility to make a “master Schedule” for the project. In this regard, the project manager should take the sole liability.

It is necessary to create the master schedule on the basis of the company’s rule. Now, the monthly and weekly target of the project will be determined on the basis of master schedule.

If it becomes easier to monitor each construction task on weekly basis, there will be no obstacles for the project to be accomplished in due course.

Therefore, the tasks given below should be undertaken to finish a building construction project in due course –:

• Create master schedule for the project
• Make a monthly plan on the basis of the master schedule
• Arrange weekly target on the basis of monthly target
• Monitor weekly target every day


2. Ensuring Contractor Selection on Time: Lots of tasks should be performed in a building construction project. Such as Civil works, Plumbing works, Electrical works, Painting works, etc.
All of these works should be executed with individual contractors. As for instance, the civil contractor should only perform the civil works like RCC and masonry works. Plumbing contractor performs sanitary and plumbing work and tiles contractors should accomplish the tiles work on a building construction project.
Although, the project manager takes the responsibility for the selection of the contractors, a site civil engineer should also assist the project manager to accelerate the selection process for the diverse work item of the project.
Check the project’s master schedule. When it is required to commence the next work phase, call for the next contractor prior to one month for executing the next task.
As for instance, if planning is made to commence tiles work after one month, enquire for tiles contractor from today.
A site civil engineer should take the liability to make sure the convenient work progress of the project. Therefore, call for desired contractors a month earlier than your master schedule to maintain smooth work progress.
Undertake the following tasks to make sure the selection of contractor on time –
• Study your project’s master schedule
• Determine when you are planning to commence next construction task
• Start enquiring of the contractor a month prior to start the actual task.
3. Ensuring Material Delivery on Time: The civil site engineer is liable for providing construction material on time to maintain the flow of construction work progress devoid of any shortage of materials.
For this purpose, don’t give order for all the necessary materials at a time rather order only those materials which are necessary on immediate basis.
Suppose you are going to develop a 2nd-floor slab and mild steel bar is required for that slab only. But if you give order for Rod for 3rd-floor slab also, a huge amount of money will be blocked unnecessarily which can be utilized for other purpose. It will not be so cost-effective.
So, the order should be given for materials which are only required.
So, the following tasks should be undertaken for making sure the delivery of materials on time – not before the time :-
• Workout the necessary materials for the task to executed next
• Make requisition for the materials. Specify material delivery date on the purchase requisition.
• Dispatch the requisition to purchase department on time. In a company, some times are required for approval of the purchase requisition. In this regard, some formalities are required. So, ensure that lead time is retained for the material delivery.
• Monitor the requisition in order that the delivery date of the materials is not missed out.
To get more information, go through the following link acivilengineer.com
7 Prime liabilities of a Civil Site Engineer in a Building Construction Project

~~~~~~~~~~~~~~~~~~~~~~~~
Published By
Rajib Dey
www.constructioncost.co
~~~~~~~~~~~~~~~~~~~~~~~~

Monday, February 19, 2018

Estimating Integration

How estimation done: Costs are generally estimated with the help of some methods that are found in Time Management idea such as one-point estimating, analogous estimating, parametric estimating and three-point or PERT estimating; besides all of this there is a different kind of estimation named method of estimation.

Bottom-up estimation is involved in the final distribution time of a project where it adds estimation of costs at each activity or work package, turning it up into control units and then finally works on whole project estimate. So the estimated created by following steps:
• Project management software: There is various kind of software that increases calculation speed needed to estimate costs and the calculations included direct, indirect, overhead and fixed cost calculations for many activities.
• Deciding resource cost rates: resources can be various kinds like human resources, vendors, consultants, suppliers, external technicians etc. and the project managers are aware about the involved rate for the resource cost.
• Reserve analysis: It gathers identification of activities with significant risks and resolution of all efforts needs to manage the occurred risks.
• Cost of quality: The quality efforts are divided as Cost of Quality.
In the time working with integration, often it is asked about estimation of interfaces that follows below kind of scenarios:
• In the New implementation of Sap, the project manager has to execute lots of interfaces to join with the previous systems
• In the B2B integration, a lot of new pattern and messages will come
• Movement from one integration broker to another.
When any of the scenarios will come interfaces are estimated by following the steps and the development is shown there:
1. Identification
2. System interactions with supported adapters
3. Specification
4. Development
5. Testing and fixing
6. Transport and configuration
7. Document
8. Going live
9. Support.
All of the steps take extra time that will expand the initial time. The 80/20 principle was invented a long ago that states that spend less time to do more work and if more time spends in the beginning of the estimation then the whole process might take longer time to end. To avoid this scenario, it is important to study about the process and understands it properly then starts the work and as there are more variations of the interfaces that look similar then it will be easy to arrange them as per order.
It must keep in mind that performing estimation is not an easy task as there will be many unknown details about development that can be seem unclear before started; so just go through them and make a detailed report.
Estimating Integration

~~~~~~~~~~~~~~~~~~~~~~~~
Published By
Rajib Dey
www.constructioncost.co
~~~~~~~~~~~~~~~~~~~~~~~~


Saturday, February 17, 2018

How to calculate volume and area of various complicated geometric shapes

In this construction video tutorial, you will be familiar with various formulas which are essential to measure the area and volume of various complicated geometric shapes.

These complicated shapes range from Trapezoidal pyramid, Right circular cone, Rumbas, Trapezium, Polygon, Circle, Rectangle, Square etc.

Geometry belongs to a section of mathematics that takes care of shape, size, relative position of figures, and the properties of space. It provides a practical means of managing lengths, area and volumes efficiently.

Geometry is segregated into two dissimilar types: Plane Geometry and Solid Geometry. The Plane Geometry is suitable for various shapes like circles, triangles, rectangles, square and more. On the other hand, solid geometry is associated with working out the length, perimeter, area and volume of different geometric figures and shapes. Besides, they are utilized to measure the arc length and radius etc.

Geometry Formula is useful for making calculation of the length, perimeter, area and volume of different geometric shapes and figures. There exist several geometric formulas, which are associated with height, width, length, radius, perimeter, area, surface area or volume and much more.

Given below, an extensive lists of different types of basic geometry formulas :-

Perimeter of a Square=P=4a
Here, a denotes length of the sides of a square


Perimeter of a Rectangle = P = 2(l+b)
Here, l denotes Length and b denotes Breadth


Area of a Square=A=a2
Here, a denotes length of the sides of a square


Area of a Rectangle=A=l×b
Here, l denotes Length and b denotes Breadth


Area of a Triangle=A=b×h2
Here, b denotes base of the triangle and h denotes height of the triangle


Area of a Trapezoid=A=(b1+b2)h2
Where, b1 & b2 belong to the bases of the Trapezoid ; h = height of the Trapezoid


Area of a Circle=A=Ï€×r2
Circumference of a Circle=A=2Ï€r
Here, r denotes Radius of the Circle


Surface Area of a Cube=S=6a2
Here, a denotes length of the sides of a Cube


Surface Area of a Cylinder=S=2Ï€rh
Volume of a Cylinder=V=Ï€r2h
Here, r denotes Radius of the base of the Cylinder and h denotes Height of the Cylinder


To learn the detail calculation process, go through the following construction video tutorial.


~~~~~~~~~~~~~~~~~~~~~~~~
Published By
Rajib Dey
www.constructioncost.co
~~~~~~~~~~~~~~~~~~~~~~~~

Friday, February 16, 2018

What are the exact room sizes, basic needs and vastu position of any Indian residential building?

To sustain a convenient and healthful life, the room space in the house should be used in an efficient manner. So, you should have sufficient knowledge on lowest room size, basic needs and exact position of various rooms in the conventional Indian residential building which are based on day-to-day activities in the household, sun’s location, privacy and grouping of rooms for smooth access and Vastu Sastra preference for house.

In this article, you will get all the details of the above mentioned topics :-

Living Room: Living room is located in the entrance of the house. It has direct connectivity with other rooms like kitchen, bedroom, staircase and bathroom.


In this place all the family members frequently meet. So, there must be adequate natural lighting and air circulation via large windows. The facing of windows should be in east and north direction to arrange sufficient lighting and ventilation.

Least room size for living room= 16 sq.m with 3m on one side.

Position, direction for living room with adherence to Vastu Sastra = North-East (Eshanya = Direction of health, power and prosperity)

Bed Room: Bed room is treated as the private rooms for family members where they perform different activities. Master bedrooms involve attached bathroom and toilet. Privacy is a great concern for this room. These rooms are frequently utilized in the night-time and early morning hours and so their facing should be in south direction or North-East direction to experience direct sunlight and heat in the early morning hours.

Least room size of bedrooms= 12 sq.m

Position, direction for Bedroom as per Vastu Sastra = South direction (Dhakshin Yama = Direction of health, happiness, growth and female love). Keep away from North-West direction.

Also, sleep with head facing south direction because earth magnetic influence.

Kitchen: Kitchen should be built up on the North-East or South-East direction with windows facing East. Modern kitchen should be constructed with shelves, loft, sink, storage and exhaust. It should be open and smoothly approachable to the living room and dining area to track the activities as well as keep in contact with other members in dining.

Least room size for kitchen = 8 sq.m

Position, direction for Kitchen with adherence to Vastu Sastra = South-East direction with cooking faces east (Agneya or Agni = Direction of health)

Agni mulai as per vastu sastram of tamilnadu
Next option is North-West direction(Vayavya or Vayu)
or finally North-East Direction (Eshanya)
Staircase
Required area of the staircase is based on the type and position of the staircase.
Least width of steps = 1 m
Landing size = 1.2 m
Rise = 150 to 180 mm
Tread = 250 to 300


Position, direction for staircase as per Vastu Sastra = South or South-West direction.

To get more information on the above topics, go through the following construction article civilrnd.com

What are the exact room sizes, basic needs and vastu position of any Indian residential building?

~~~~~~~~~~~~~~~~~~~~~~~~
Published By
Rajib Dey
www.constructioncost.co
~~~~~~~~~~~~~~~~~~~~~~~~

Thursday, February 15, 2018

Structural Design – Minimum Standard

Thumb rules for Structural Design of RCC Structures: It is advisable to use superior structural design software like ETabs or Staad Pro for making the design of structures. There exist different types of variables in making the design of a structure and therefore no minimum standards are perfect.

This guide is very helpful for making the design of very small structures, as for instance up to G+1 floors. It is recommended to apply good software for structural designer instead of manual methods. Manual method is only applicable for checks.

Real design is accomplished by applying the computers, through very advanced design concepts like pushover analysis, seismic analysis, wind loads simulation and various advanced processes.

Design of RCC Structural Components: This construction article sheds light on the minimum standards that should be undertaken for making the design of RCC structural components of a structure, like columns, beams, slab and foundation. Besides, the explanation is also provided for the minimum safe standards for the reinforcing bars which should be employed for the design of the above mentioned Structural Components.

Minimum cross-sectional dimension for a Column is 9”x 9” (225MM x 225MM). But to get rid of slenderness issues, a rectangular column with dimension 9″x 12″ (225 MM x 300 MM) should be designed for maintaining safety.

It is recommended to utilize M20 grade concrete for construction as per IS 456:2000 standard. The minimum steel required in a 9″ x 9″ column is 4 bars of 12 MM containing stirrups of 8 MM steel rings at a gapping of 150 MM centre to centre.

In a 9″ x 12″ column, two more bars should be included to easily manage the total to 6 bars having 12 MM diameter. This design is trustworthy for up to G+1 floors.

Minimum RCC beam size should not be under 9″x 9″(225MM X 225MM), with an extra slab thickness of 125 MM. It will be perfect to apply a minimum of 4 bars, with 2 bars having 12 MM thickness in the bottom of the beam, and 2 bars having 10 MM at the top of the beam.

A concrete cover having 40 MM dimension should be used. Besides, M20 grade of concrete (1 part cement : 1.5 parts sand : 3 parts aggregate : 0.5 parts water) should also be used.

Minimum thickness of RCC slab should be 5″ (125MM) as a slab may comprise of electrical pipes which are implanted into them with 0.5″ dimension or more for internal wiring to significantly decreases slab depths at specific places. It leads to cracking, weakening and water leakage throughout rains. Therefore, a minimum thickness of 5″ should have been retained.

Minimum size of foundation for a single storey of G+1 building should be 1m x 1m, where safe bearing strength of soil is 30 tonnes per square meter, and the approaching load on the column does not surpass 30 tonnes. Minimum depth of footing should be 4′underneath ground level. It is suggested to go to depths up to had strata.

To get more information, go through the following link www.civilprojectsonline.com

Structural Design – Minimum Standard

~~~~~~~~~~~~~~~~~~~~~~~~
Published By
Rajib Dey
www.constructioncost.co
~~~~~~~~~~~~~~~~~~~~~~~~

Wednesday, February 14, 2018

The Basic Requirements of Formwork

Formwork is a concrete construction that is used as either short or permanent molds into which fresh concrete or similar kind of materials are gushed to make it harden. The different types of concrete formwork construction depend on the material and the kind of structural element. They are given various names as per the type of structural member construction like slab framework, beam framework, column framework etc. to use in beams and columns.

The harden process requires time and includes an expenditure up to 20 to 25% of the cost of the structure or more than that; the temporary design structures are made of economic expenditure.

While the removing process of the framework is known as stripping that can also be used later; the unusable are called panel forms and the non-useable are called stationary forms. The most commonly used material for formwork is Timber.

This article is a short knowledge for people about formwork, the different types of formwork and the basic needs to complete a formwork properly. Formwork comes in several types such as:

1. Traditional timber framework
2. Engineering Formwork System
3. Re-usable plastic formwork
4. Permanent Insulated Formwork systems
5. Stay-In-Place structural formwork systems
6. Flexible formwork


Requirements of Formwork: It is stated above that framework varies as per material and material is the main ingredient for every framework, but for any kind of chosen material the three common principles of quality, safety and economy should be the same. While the quality of material ensures safety and also considerably helps to achieve the economy; any kind of failure in framework can cause of the loss of life and tragic financial loss. To avoid the loss the following guidelines should be followed from start to framing materials and for the associated components:

1. Strength: The strength of material must be sufficient to strong the forces expected and this is the important for both the structural design and safety aspect.
2. Stiffness: the structural movement under load should be small and sure; these deformities and separations are the necessary part of the whole deviations in the formed concrete surface. While planning the formwork system, a designer must take decisions upon the total acceptable variations and the extend workmanship errors and structural deformity. The material stiffness and the workmanship accuracy must be stable to ensure the stability of the total deviations to keep the tolerances.

3. Impact Resistance: The forms are made to make sure that the damaged form that is useless does not make falling debris and to make sure this important safety quality, materials displaying ductile failure are far above than those fail in a hasty and brittle manner.
4. Durability: The framework must be durable either it will affect the economy and the achievement quality concrete product at every reuse of the formwork; formwork is always pre made and used out in the open. When the matter of re-uses came the thing is dependable on its reaction of materials and components with weather and the framing, components and formface materials should be strong in any environment. Material durability is important for both the achievement of good quality concrete surface finishes and safe formwork structures.

5. Weight: While the assembling process in formwork, both the members and components are shifted into position by hand that will be applicable after the complete framework which are heavy and need a crane to do the shifting work. So the framing members, formwork components and formface materials must be keep in size so that they must be carried and lifted by the worker or the crane etc.
6. Accuracy: Every construction process is dependable on a lot of money so the work of lifting and cutting of materials must be done within a minimum amount of money and consistency of size of materials, plywood sheets and framing members is very important.
7. Compatibility: The framework materials should be fitted with either the fluid concrete or the strong concrete and at the formface, the elements of the form materials must not react with the wet cement or concrete.
8. Insulation: Some materials react with the environment if it’s become extra hot or cold, so the protection for the materials is must; if the mix becomes frozen and the chemical bondage damages then the concrete has to be placed at low temperatures, heat the mixing water etc. The placing of the fluid concrete for all forms can cause some damage with the crushed rock aggregate and the proper steps has to be taken to stop it.


The Basic Requirements of Formwork


Read more

~~~~~~~~~~~~~~~~~~~~~~~~
Published By
Rajib Dey
www.constructioncost.co
~~~~~~~~~~~~~~~~~~~~~~~~

Tuesday, February 13, 2018

Some handy tips to find out the compressive strength of mortar

It is advisable to apply 2 inch or 50mm cubes as stated by ASTM C109 / C109M – Standard Test Method for Compressive Strength of Hydraulic Cement Mortars to define the compressive strength of mortar.

Mortar is a formed by amalgamating cement, sand mixed with water. Application of mortar is found in masonry works like brick masonry and stone masonry and for plastering walls, columns etc.

Mostly utilized mix ratio of mortar in masonry works range from 1:3, 1:4 and 1:6 of cement to sand ratio. For vital masonry structures like brick walls, 1:3 ratio is applied.

Why Compressive Strength Test of Mortar is Important?

Usually masonry structures are built up as load bearing. As for instance, load bearing walls, load bearing masonry columns etc. are developed for residential and other masonry buildings. For a masonry buildings, foundations are also built up with brick masonry.

Towards a load bearing masonry construction, vital fact is to recognize the compressive strength requirement of masonry to resist the load that operates on it. A masonry wall is likely to deal with compressive loads from floors over it and should contain adequate strength to resist it. Therefore, masonry compressive strength should have been adequate to support the loads on wall.

How to find out the Compressive Strength of Mortar

To determine the compressive strength of standard cement sand mortar cubes, the following apparatus and methods of the test are undertaken :-

Apparatus: 7.06cm cubes moulds (50cm2 face area), apparatus for measuring and blending mortar, vibrator, compression testing machine etc.

Method for checking Compressive Strength of Mortar
Choose 200gm of cement and 600gm of standard sand in the mix ratio 1:3 by weight) in a pan.


The standard sand is made of quartz, of light, gray or whitish variety and does not contain silt. The sand grains is like angular, the shape of grains is similar to the spherical form, extended and flattened grains are found in very small quantities.

Standard sand passes across 2 mm IS sieve and is kept on 90 microns IS sieve with the particle size distribution as given below.

For more information, go through the following link dssekamatte.blogspot.in

Some handy tips to find out the compressive strength of mortar


~~~~~~~~~~~~~~~~~~~~~~~~
Published By
Rajib Dey
www.constructioncost.co
~~~~~~~~~~~~~~~~~~~~~~~~

Monday, February 12, 2018

Construction Project Scheduling

It is generally a mechanism for communicating about the tasks has to do and the organizational resources that will be assigned to complete all those tasks in the given time.
In simple words, a project schedule is a kind of document that gathers all the important works so that project can be delivered on time. A project is a collection of many tasks where each task has a fixed start and end to complete it in time though people have different schedules and their every detail need to be documented in order to successfully plan those tasks.
In past time, the project schedules were printed on calendars on a shared wall in the water-cooler room or shared spreadsheets via email buy in today’s scenario, most of the teams use online project scheduling tools.
As in the current scenario, most of the projects have many moving parts and they are continuously changing; so project scheduling software automatically upgrades tasks which are dependable and can’t completed on time. Besides that, it also provides automated email alerts so that team members can be aware about their scheduled tasks’ time and manager will know when someone’s availability has changed.
Methods to schedule a project: The following steps will discuss how a project is scheduled -
• Specifying Activities: there are lot of activities in every project and at first the important ones need to be listed, here a Work Breakdown Structure or WBS and a deliverable diagram will help to start these activities and to arrange them by projecting the necessary tasks to fulfill them in a right order.
• Make the estimates: After having the defined activities and dividing them into tasks, the project manager has to decide the time and effort to complete them in order to calculate the right schedule.
• Design dependencies: Tasks should be only started after completing the existed ones and it is the task dependency that is reflected in the schedule through these linked tasks. So make sure that the important ones should be on the top of the schedule to complete the project on time.
• Assign resources: At last, the project manager has to finalize the planned schedule as per the needed resources to complete those tasks on time. Make a team; assign them in the project so that all the tasks will be completed together on time.
Maintaining the schedule after the project is started: After scheduling every little object in a project, they need to be manually punched into an Excel Spreadsheet and any project management software can automate much of the process for the manager. There are some programs on the market that are useful for easy scheduling duties and while a project; the managers often need a tool that can fit with the variety of scheduling issues that need to track.
• Scheduling tasks: The project manager has to know about smart software that help to give enough flexibility for controlling many responsibilities attached with every tasks in the project. He can either add tasks and dates into the Gantt chart to keep a visual image of each task’s duration and if the dates change, they can be automated by simple drag and drop with the changes. The email notifications are a great way to keep the track of completing task and the update will be done automatically.
• Scheduling people: To complete all the tasks on time a project manager should assemble all the tasks at first and assemble a team which must be scheduled as per the task list to manage the project. A manager should be aware that team members may take holidays, personal vacation or days and he should schedule the project’s task list so that other team members can pick up the slow in their absence so that the schedule will not suffer. He can keep the task scheduling view on the Gantt chart with resource and workload scheduling features.
• Scheduling projects: Making a project dashboard will help to manage the tasks to be completed in a clean and easy way without any interruption or problems, in addition that he can also use the graphs and charts the dashboard that generate to drill down deeper and customize the results to provide the right information on the right time.
Project Scheduling

~~~~~~~~~~~~~~~~~~~~~~~~
Published By
Rajib Dey
www.constructioncost.co
~~~~~~~~~~~~~~~~~~~~~~~~