adsense analytic

Monday, November 28, 2016

How to estimate the quantity of cement, sand and aggregate in Microsoft Excel

This construction tutorial will teach you the detailed method for computing quantity of Cement, Sand & Aggregate in concrete as well as cost of materials with Microsoft Excel.

The volume of executable PCC is taken as 6 cubic meter that should be performed with M15 grade of concrete whose ratio is 1:2:4. MS Excel program is very useful to instantly produce and manage your concrete cost estimates accurately. Get detailed takeoff and summarize the quantities automatically based on the scope or assembly item.

Benefits of excel based estimating:

• Most of the calculations are automated
• User-friendly to use
• Save huge time in calculation
• Easily customizable according to your requirements


~~~~~~~~~~~~~~~~~~~~
Published By
Rajib Dey
~~~~~~~~~~~~~~~~~~~~

Friday, November 25, 2016

The process for estimating Cement, Sand and Aggregate Quantity in Concrete

This construction video provides detailed methods for estimating the quantity of cement, sand and aggregate in cement concrete to figure out the cost of all the materials. In this video, the volume of PCC to be prepared is taken as 10 cubic meter that is to be completed with M15 grade of concrete in the ratio of 1:2:4.

In a simple term, concrete is defined as a blend of paste and aggregates. The paste is formed with portland cement and water and covers the surface of the fine and coarse aggregates. With a chemical reaction known as hydration, the paste is solidified and becomes stronger to develop the rock-like mass called concrete.

Due to its longevity, firmness and comparatively marginal cost, concrete is mostly recognized for the buildings & infrastructures like houses, schools and hospitals as well as airports, bridges, highways and rail systems all through the globe.

Cement is actually a vital component of concrete. This fine powder is amalgamated with water, sand, and gravel or crushed stone (fine and coarse aggregate) and develops the rock-like mass known as concrete.


~~~~~~~~~~~~~~~~~~~~~
Published By
Rajib Dey
~~~~~~~~~~~~~~~~~~~~~

Thursday, November 24, 2016

Some useful construction tips for becoming a successful rebar checker

While developing a big project, there should be a perfect technical engineering perception and cautious observation. Besides, other crucial examinations, Reinforced Cement Concrete should be verified for rebar toward the supplied construction drawings / shop drawings or technical specifications.

It should be remembered that the obstacle and cost associated with this activity may cause imperfection from the contractors end and it should be resolved / settled by a well-known consulting firm assigning on the inspection of execution.

One should have sound knowledge and well versed with the binding method of the steel rebar. Given below, some useful construction tips suggested by the top peers:-

a. Initially, one should have good knowledge on how to study a rebar drawing as well as communicate with it in the jobsite. In order to become a proficient rebar checker, you should have the capability to read drawing.

b. Carry a measuring tape with yourself so that you can verify the spacing and the splice length or development length.

c. Use a plastic glove, when checking the rebars as holding steel with bare hands may cause harm to the skin of of your body.

d. Should be familiar with the physical features of the construction component i.e. installing the drainage pipe or electrical conduit or replacing water stopper and any other pipes / embedded item.

e. Use vernier caliper to verify rebar diameter, rebar spacing, rebar development length, lap / splice length, alignment. Other important things range from no sag or buckling in the bars, perfectly fixed & tightened couplers, rust free bars, verifying clear cover, counting no of bars as per drawing specifications and must not be below or over 2 bars.

f. As a newbie in this field, try to keep in touch with contractor’s foreman or site engineer as they know well how to arrange these bars.

g. You should have good knowledge concerning the steel quality tests like tensile strength check or torsion failure strength or coupler tension strength check etc. Make sure that the steel are used after proper verification and poor quality steels are used.

h. Because of rough field conditions and difficultly in setting up / fixing of rebars, the proper design can’t be created. But you must be very careful about it as improper design may lead to collapse of a building.

i. One of the very crucial factors is to retain the exact orientation of bars like main rebars should be always arranged under the distribution or temperature rebars. It can be verified from the drawings submitted to you.


Some useful construction tips for becoming a successful rebar checker

~~~~~~~~~~~~~~~~~~~~~
Published By
Rajib Dey
~~~~~~~~~~~~~~~~~~~~~

Wednesday, November 23, 2016

Advantages Of Truss Mesh Reinforcement For Brick Wall

Truss mesh reinforcement is essential for developing masonry wall. Truss mesh reinforcements are implanted into the horizontal mortar joints of masonry walls and constant with the wall length.

Reinforces various types of masonry walls

Considerably lowers the cracking that may happen due to thermal stresses

Improves resistance capacity against penetration of water, because cracks are well organized

Improves lateral flexural strength

Enhances elasticity

Enhances performance of masonry walls under different stresses

Specifications

Existing Materials: hot dipped galvanized, electro galvanized or stainless steel.
Wire diameter:1.8mm - 2.0mm.
Weight: 2kg - 10kg.
Length: 3 meters long, the space distance is 40cm
Width 5cm, 10cm, 15cm, 20cm ,25cm, 30cm.


Advantages Of Truss Mesh Reinforcement For Brick Wall

~~~~~~~~~~~~~~~~~~~~~
Published By
Rajib Dey
~~~~~~~~~~~~~~~~~~~~~

Saturday, November 19, 2016

Standard Designs of Gabion Retaining Wall

A gabion is a cage, cylinder, or box full with rocks, concrete, or sometimes sand and soil for use in civil engineering, road building, and military applications and landscaping.

Here are some different designs based on different heights:

1m high wall
A 1m high wall is very easy to build and it requires 1m x 1m x 1m or 2m x 1m x1m baskets. The smaller size is recommended if the length user have to cover is small as it will lessen transport costs. User can also use 1/2m deep baskets this will save on the cost of fill but will decrease the strength of the wall and is recommended only in situations where the bank is fairly secure.

2m high wall
Gabion baskets are a mass retaining system accordingly, to construct a wall for the higher area which requires retaining; for that reason the wall must be heavier enough. For a gabion wall’s standard design the structure is like a pyramid. As a matter of fact, for every 1m expansion in wall height, the bottom row basket depth should be expanded by half a meter.

3m high wall
In this example the top 2 rows are the same as a 2m wall but with a .5m increase in the depth of the bottom row.
The bottom row is 2 meters deep middle row 1.5m deep and top row 1m deep. In general usage of 2m x 1m x 1m baskets bottom row 1.5m x 1m x 1m baskets in the middle row and 1m x 1m x 1m or if possible 2m x 1m x 1m baskets going sideways on the top row.

The image below is the example of gabion retaining wall design of different heights.

gabion retaining wall design

~~~~~~~~~~~~~~~~~~~~~
Published By
Rajib Dey
~~~~~~~~~~~~~~~~~~~~~

Thursday, November 17, 2016

How to use Etabs 2016 for slab design

This construction video provides useful information on how to use Etabs 2016 for creating effective slab design.

This newest software can be used to make integrated structural analysis, design and drafting of building systems. ETABS 2016 contains supreme 3D object based modeling and visualization tools as well as rapid linear and nonlinear analytical capacity, superior and wide-ranging design capacities for a wide array of materials, and intuitive graphic displays, reports, and schematic drawings which facilitate the users to smoothly & instantly read and understand analysis and design results.

ETABS combines each phase of the engineering design process from initial design perception to the formation of schematic drawings. Formation of models becomes so simple. With superior drawing commands, one can instantly generate floor and elevation framing. CAD drawings are directly transformed into ETABS models or applied as templates onto which ETABS objects are overlaid. The advanced SAPFire 64-bit solver facilitates the users to instantly evaluate exceptionally big and complicated models. It also supports nonlinear modeling methods like construction sequencing and time effects (e.g., creep and shrinkage).


~~~~~~~~~~~~~~~~~~~~~
Published By
Rajib Dey
~~~~~~~~~~~~~~~~~~~~~

Monday, November 14, 2016

How to use Tekla Structure 2016 for bridge pier reinforcement

This construction video briefly shows how to use Tekla Structure 2016 to perform bridge pier reinforcement.

Concrete piers stand for vertical structural elements that support the weight of a building or structure. The role of the concrete piers is similar to the table legs. If they are designed properly, and arranged on solid ground or to a depth that the friction on the sides of the pier is exceeding the load placed on the pier, the piers and the structure will be immovable.

Most concrete piers applied over the average home for a deck or other structures are generally lower than 24 or so inches in diameter at the base of the pier. As the pier increases and out of the ground, it can be minimized in size to as small as 10 inches in diameter. The bottom of the pier should always remain under the frost line in the area.

The bottom of the pier should be broader as compared to the top. The wider base facilitates allocating the weight of the structure over more soil. Thus the design becomes stable enough.


~~~~~~~~~~~~~~~~~~~~~
Published By
Rajib Dey
~~~~~~~~~~~~~~~~~~~~~

Thursday, November 10, 2016

Simplify your concrete estimating process with Concrete Foundation Estimator 1.1.1

Progress Builders, a full-service, Design-build company, working on residential construction market, just introduced Concrete Foundation Estimator 1.1.1 compatible with iPhone, iPad and iPod touch devices.

This newest construction app will be a very resourceful and exceptionally influential productivity tool for all contractors and owner-builders.

Concrete Foundation Estimator 1.1.1 was purposely intended to enhance and make the process simpler for estimating and bidding on concrete jobs. This construction software facilitates the Concrete Foundation Estimator to produce professional, editable, easy-to-follow construction bids, estimates, and quotes, together with the all or any part of the following:
  • Concrete demolition of existing slabs and footings
  • Excavation volume and cost using manual labor or machinery
  • Extracted soil hauling and dumping fees
  • Crushed concrete hauling and dumping fees
  • Materials cost and volume for
  • Footings
  • Stem walls
  • Piers
  • Slabs
  • Reinforcement
  • Shear walls
  • Anchor bolts
  • All thread retrofits
  • Concrete ready-mix or in bags
  • Volume, cost and waste %
  • Labor for piers, reinforcement assembly and concrete pouring
  • Cost of concrete pumping
  • Adjustable Workman's compensation rate
  • Sales tax in your area for all materials
  • Job overhead
  • Custom fields to add to estimate
The Concrete Foundation Estimator contains an in-built portfolio page that saves all projects. One will be able to recover and revise estimates instantly, create revisions, make PDF quotes as well as spreadsheets editable in excel. There also exist some in-built Tutorials containing tricks for how to accumulate values from the plans and demonstrated explanations for each section.

While making estimation, you should not have to repeatedly find materials and labor cost. "CFE includes predefined settings which can be changed at your own level of price, time and materials utilized. The users have to get through all sections and update predefined values. You don’t have to update material or labor cost on a regular basis.

Estimator 1.1.1 supports iPhone, iPad, and iPod touch as well as iOS 8.0 or later.

Concrete Foundation Estimator 1.1.1 will cost $4.99 USD and can be access all through the world via the App Store in the Business category.


~~~~~~~~~~~~~~~~~~~~~
Published By
Rajib Dey
~~~~~~~~~~~~~~~~~~~~~

Tuesday, November 8, 2016

How to install stucco on a wood or any wall

This construction video sheds light on how to set up stucco on a wood or any wall. Stucco stands for a long-lasting, alluring, and weather-resistant wall covering that can be utilized for coating wall surfaces in one or two thin layers toward an interior and exterior finish.In this video, it is shown that how plaster is done for coating wall surfaces or moulding into architectural decorations. The video will provide great assistance to resolve all your general home repair issues. Glass, concrete and stucco generally fail to stretch much, rather they break or crack with all movement and or vibrations.The video also focuses on how to deal with hairline cracking and repair stucco cracks which may happen due to high wind and rain.Besides, one can also get details on different tools and their application as well as numerous plastering tips.


~~~~~~~~~~~~~~~~~~~~~
Published By
Rajib Dey
~~~~~~~~~~~~~~~~~~~~~

Monday, November 7, 2016

How to create the design of simply supported steel beam

This construction video is created for educational purpose.The tutorial will be a complement to the "Mechanics of Materials" course conducted at the Colorado School of Mines.By watching this construction video tutorial, one can learn how to create the design efficiently for simply supported steel beam.

Download Design of a Steel Beam in pdf


~~~~~~~~~~~~~~~~~~~~~
Published By
Rajib Dey
~~~~~~~~~~~~~~~~~~~~~

Saturday, November 5, 2016

A live demonstration on Raft versus Pile Foundation

If the gaps of footing are nearer, a raft foundation is recommended. Often, basements are created for particular purpose imposing to implement raft foundation. Usually, a raft foundation refers to a floating foundation that includes the ground completely to disperse load.

Pile foundation is mostly used if the spacing of footing is big & soil is costly in nature & it is not reasonable to excavate complete depth of this costly soil below the footing. If the spacing of column is big, raft foundation becomes expensive.

A raft foundation is ideal for feasibly inconstant soils, or soils which are extremely flexible. The raft system decreases the pressure on foundational soils. In some cases, a pile foundation is utilized in equivalent situations as a raft foundation. Piles should be set up intensely to spread to a strong strata of material, like gravel or bedrock.

A raft system will be perfect in some conditions where the depth of silt, sand or fine soil is very deep to develop a pile foundation. A spread footing is also ideal for feasibly unsteady soils. A spread footing needs excavating to a specific depth under the site grade, and considerably wider as compared the footprint of the house, and backfill with condensed, structural gravel fill. As soon as it is positioned, a standard concrete foundation is founded on the structural fill.


~~~~~~~~~~~~~~~~~~~~~
Published By
Rajib Dey
~~~~~~~~~~~~~~~~~~~~~

Friday, November 4, 2016

Process for executing Bulking Test for Fine Aggregate (Sand)

The bulking test must be carried on at the commencement of work, and afterward on every new batch of sand and after any material in the weather – rain or hot to make sure that the bulked volume of the sand remains unaltered.

When sand is supplied and is applied on the job, it often includes moisture that induces films of water to develop on the surface of the particles, fluffing them separately. This is known as bulking and for moisture content of approximately 5 or 6 percent it may be as much as 20, 30 or even 40 percent based on the grading of the sand. Bulking of sand is generally found in fine sand except for coarse sand.

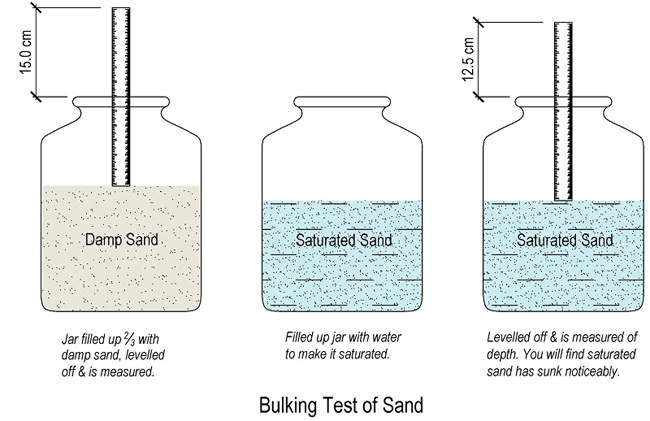
Objective: The standard test for bulking is dependent on the circumstance that when damp sand bulks, the volume of saturated sand rises.

While applying fine aggregate (sand) to produce concrete, it is essential to find out the quantity of used sand that has been bulked. It is done with bulking test. This test is dependent on the fact that when damp sand bulks, the volume of saturated sand entirely immersed with water is identical though the sand is dry. So, it is possible to calculate the volume of saturated sand and the result is identical to that of dry sand.

Tool: To conduct the test, the following tools are necessary:

01. a straight sided container like a 1 kg jam jar, or a clean, empty cane
02. a steel measuring rule
03. a steel rod to support the sand
04. a second container to immerse it into, and some water.

Method: Initially, load the container about two-thirds filled with the sand to be tested. Drop it lightly, do not pack it.

Smooth the top of the sand and drive the steel rule down through the bottom, calculate its height. Assume it to be 15 cm.

So, the height of the damp is identified, bulked sand. Follow the next step for obtaining the height of the similar sand if soaked with water. It is now possible to compare the two. Unfilled the sand in the other container and ensure to check that none of it losts in the process, and fill half portion of the first container with water. Now place the sand back into the water, slowly, so that it is completely soaked.

Initially bring back about half the sand and rod it perfectly to eliminate any air. After that, include the rest and rod once more in the similar way and level off top. Now drive your rule through the sand as formerly and calculate the new height then it is found that it contains sunk clearly. Approximately, it now calculates 12.5 cm.

Process for executing Bulking Test for Fine Aggregate (Sand)
Image Courtesy: gharpedia.com

To read the complete article, go through the following link gharpedia.com

~~~~~~~~~~~~~~~~~~~~~
Published By
Rajib Dey
~~~~~~~~~~~~~~~~~~~~~